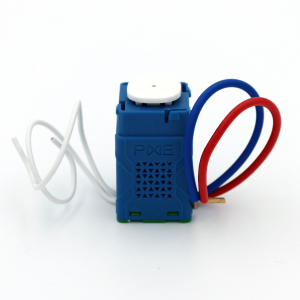
A number of PIXIE devices have the ability to use BP or standard momentary mechanism in a range of different ways to deliver further flexibility within the PIXIE ecosystem.
Remote control of PIXIE via standard momentary press mechs #
On some projects the best way to control PIXIE, or the only way based on the wall plates being used or existing wiring, is installation of a standard momentary bell press devices.
These inexpensive, momentary press mechs can help installers out of a tight situation or deliver a simpler interface to other systems, without additional PIXIE devices or setup required to perform a function.
Smart Modules #
Within the PIXIE range of products, all the core PIXIE smart modules are also provided with a “/BP” version.
- – Smart Dimmer – SDD300/BTAM/BP Gen3 Dimmers with Bell Press capability
- – Smart Switch – SWL600BTAM/BP Gen3 Switch with Bell Press capability
- – Smart Multifunction Controller – SMF/BTAS/BP – Gen3 Multifunction with Bell Press capability
- – Smart SFI Dimmer – SDD400SFI/BP – Flicker Free system dimmer with Bell Press capability
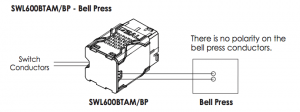
Each of these products have the standard electrical cabling for active/switched active connection (SMF/BTAS/BP has Active and neutral) – as well as 2 additional cables for volt free connection from a Bell Press mechanism.
As these are the most common PIXIE devices used on most projects, installing PIXIE is now possible in just about every scenario.

SMF/BTAS/BP uses Active and Neutral AND has 2 additional BP cables.
Other PIXIE Modules with Bell Press Functionality #
In addition to the listed PIXIE smart modules being available in a BP version, there are some other products in the PIXIE Range which also have Bell Press Inputs.
- – Blind and Signal Controller – PC206BS/R/BTAM – comes with 2 Bell press inputs integrated – 1 to control each of the 2 relay channels on board this device
- – Dual Relay Controller – PC206DR/R/BTAM – comes with 2 Bell press inputs integrated – 1 to control each of the 2 relay channels on board this device
- – Single Colour LED Strip Controller – LT8915DIM/BT – comes with 1 Bell press input integrated – Provides on/off/dim control of connected LED Strip
- – RGB LED Strip Controller – LT8915RGB/BT – comes with 2 Bell press inputs integrated – Provides a range of control options – see video below
Common Uses of PIXIE BP – Bell Press Modules #
There are 2 common methods where a PIXIE BP device is deployed in a PIXIE project.
- 1. When the PIXIE Smart module will not fit into the wall plates being used on a project
- 2. When a 3rd party system needs to control also control a load already controlled by PIXIE or signal a PIXIE system to performa function

SWl600BTAM-BP showing BP connections – which are not polarity sensitive
When PIXIE will not Fit in #
On some occasions the choice of wall plate on a project, means that the PIXIE smart module cannot be installed into the wall plate as per its primary installation method.
In these cases the BP version of the smart modules means PIXIE can be installed in these project and the chosen wall plates can remain.
This use of the PIXIE modules is sometimes referred to as a PUCK installation.
The entails wiring the PIXIE smart module as per normal to control the load, and instead of installing the PIXIE smart module into the wall plate, it is installed either in the wall cavity or in the ceiling space in a suitably safe electrical enclosure, AND the BP cables are connected to either a BELL PRESS mech or a ROCKER MECH on the chosen wall plate.
Some Useful Examples #
However it WILL NOT MIMIC the setup function button presses such as manual pairing (4 presses) and device reset ( 9 presses). These still need to be performed by pressing the actual button on the smart module.
Example 1: Bell Press Mech Controlling PIXIE Master Device #
Useful when the PIXIE smart module ( dimmer or switch) will not fit into the wall plate
- ⇒ Connect conductors normally for controlling the load
- ⇒ Connect BP cables from PIXIE device to the rear of the Bell Press mechanism on the wall plate – some extension of cables may be required
- ⇒ Place the PIXIE Smart module/s in the wall cavity or ceiling space in an electrically safe enclosure
- ⇒ If a momentary press mech this will MIMIC exactly the operation of the connected PIXIE device.
- ⇒ The home owner still has full control over the PIXIE smart module via the PIXIE app, voice control, groups, scenes etc
Example 2: Alarm system controlling PIXIE SWL600BTAM/BP #
Useful when the alarm system has the ability to provide 1 or more dry contact outputs when an ‘action’ occurs on the alarm system.
In this example we are using the PIXIE smart switch SWl600BTAM/BP.
- ⇒ Connect conductors normally for controlling the load
- ⇒ The PIXIE device may be able to be installed into the wall plate if compatible or it can be installed in the wall cavity /ceiling as described above
- ⇒ Connect BP cables from PIXIE device to receive the dry contact output from the alarm system output.
- ⇒ This way the home owner can still operate the PIXIE switch from wall as per normal, AND the alarm system can activate JUST THIS circuit of lightning when an event occurs
- ⇒ The home owner still has full control over the PIXIE smart module via the PIXIE app, voice control, groups, scenes etc, with the additional connection to the alarm system providing simple on site integration
Example 3: Bell press Mech Controlling PIXIE Multifunction Controller #
Useful when using the SMFBTAS/BP device for Scene control with a single-tap and/or double-tap functions and group control.
This is a simply way to deliver the power and functionality of the PIXIE Multifunction controller in situations where the module will not fit into the wall plate
- ⇒ Connect conductors normally – for the Multifunction Controllers that is an Active and a Neutral
- ⇒ Connect BP cables from PIXIE device to the rear of the Bell Press mechanism on the wall plate – some extension of cables may be required
- ⇒ Place the PIXIE Smart module/s in the wall cavity or ceiling space in an electrically safe enclosure
- ⇒ If a momentary press mech this will MIMIC exactly the operation of the connected PIXIE device.
Example 4: 3rd Party System Controlling PIXIE Multifunction Controller #
Useful when using the SMFBTAS/BP device and a 3rd party system to activate up to 2 scenes when an event occurs in the 3rd party system.
This is a simply way to deliver the power and functionality of the PIXIE Multifunction controller and have up to 2 PIXIE scenes recalled by a 3rd party system. As PIXIE Scenes can impact all installed PIXIE devices this is a powerful method to control part of or a complete PIXIE installation from a 3rd party system.
This is often used when integrating PIXIE with a range of the following types of systems:
- 1. Legacy lighting control and smart home automation systems – where control of PIXIE is desired from the legacy system interface.
- 2. ALARM SYSTEMS
- ⇒ Connect conductors normally – for the Multifunction Controllers that is an Active and a Neutral
- ⇒ The PIXIE device may be able to be installed into the wall plate if compatible or it can be installed in the wall cavity /ceiling as described above
- ⇒ Connect BP cables from PIXIE device to receive the dry contact output from the 3rd party system.
- ⇒ If installed into the wall plate the home owner continues to have on wall control as well as 3rd party integration.


