Controlling a PIXIE sensor with another PIXIE sensor #
Two ways to make one PIXIE sensor act on another. The full PROGRAMode method gives you the most flexibility, and the MASTERlink approach is faster, simpler, and needs no Gateway. This article covers both.
There are two ways. Pick the right one for the job. #
As of April 2024 there are two ways to make a PIXIE sensor control another PIXIE sensor. The simpler path solves most real-world scenarios with no Gateway required, while the full PROGRAMode method gives you complete flexibility for scenarios where direct sensor-to-sensor logic is genuinely required.
PROGRAMode with Gateway G3 #
Use the PIXIE Gateway G3 (SGW3/BTAM) to track each sensor's relay state and trigger Scenes that command the other sensor.
- Sensor #1 has a switchwire connected to a load
- Sensor #2 has only Active and Neutral
- Both sensors must equally drive both light sources
- Scene delays let the system reset cleanly between events
MASTERlink (no Gateway needed) #
Use the MASTERlink feature on each sensor to drive a Group of PIXIE Master devices. Cleaner wiring, fewer steps, no Gateway required.
- Neither sensor is wired to the loads
- Loads are driven by their own PIXIE Master devices
- Both sensors operate the same Group
- Requires sensor firmware version 1.3 or above
Three concepts to have clear in your head. #
Both methods rely on the same building blocks. A few minutes here will save a lot of time on site, especially if you are setting up your first sensor-to-sensor configuration.
PIXIE sensors #
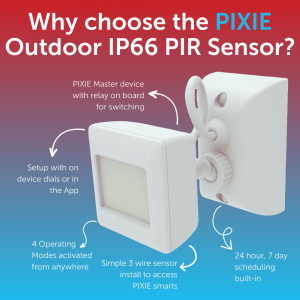
- Two types: indoor (PIR 360 degree, surface or recessed) and outdoor (IP65, surface mount)
- PIXIE sensors are PIXIE Master devices
- Setup via on-board dials OR via the app. The last method used wins
- Multiple operating modes, switchable from the app, schedules, and Scenes
- A sensor cannot directly control another sensor; an intermediate Scene or Group is needed
PROGRAMode #
Conditional logic for the PIXIE PLUS smart home, included with every PIXIE Gateway G3 at no additional cost. PROGRAMode tracks the state of any Master device, including the relay inside a sensor, and fires actions across the PIXIE mesh when that state changes.
Read the complete PROGRAMode guide →Scenes and Scene Delays #
Scenes set multiple PIXIE devices to specific states from one command. Scene Delays (Gateway G3 required) sequence those commands over time:
- Do this, this and this
- Then delay 3 minutes 24 seconds
- Then do this and this
- Then delay 3 seconds
- Then do the final action
One worked example. Two stairs sensors, two light sources. #
The same scenario runs through both methods so you can see the contrast clearly. The constraints are deliberately realistic: this is the kind of layout you actually meet on site.
Two sensors on a stairwell. Two electrically separate light sources. #
We have two sensors in a home: one at the top of the stairs and one at the bottom of the stairs.
These sensors cannot be electrically connected together, nor can they each be connected to both switchwires.
The homeowner wants both sensors to operate two electrically separated light sources equally. When either or both sensors detects motion, turn on both light sources. When either or both sensors time out, turn off both light sources.
Sensor #1 atop the stairs has its switchwire connected to Light circuit #1 (down lights). Sensor #2 at the bottom of the stairs has only an Active and Neutral connected to it for power. The second light source is a PIXIE LED strip controller (LT8915DIM/BT), which is also a PIXIE Master device, electrically wired separately to both sensors.
The full PROGRAMode method. Maximum flexibility. #
This method uses the PIXIE Gateway G3 to track each sensor's relay state and to drive the other sensor through Scenes. It needs more steps up front, but once it is set up the same pattern repeats for every similar scenario.
You must have a PIXIE Gateway G3 (SGW3/BTAM) for PROGRAMode and Scene Delays to work. Without a Gateway, use Method 2 (MASTERlink) further down this page.
Set each sensor's time-out period #
Use the standard device setup interface in the PIXIE PLUS app to configure how long each sensor should hold its relay ON after detecting motion. This is the foundation; everything that follows depends on these settings being right for the site.
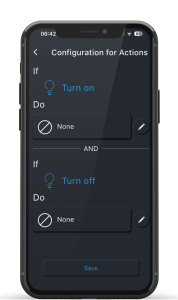
Create a PROGRAM: Sensor #1 motion turns the LED strip ON #
Sensor #1 has its switchwire connected to the downlights, so the downlights handle themselves. We need a PROGRAM so the LED strip controller mirrors that behaviour.
- Open PROGRAMode: bottom menu → MORE → Program Mode
- Create a new program and give it a name
- Set WHEN to Anytime (simplest starting point)
- Set TRIGGER to: relay in Sensor #1 turns ON
- Set ACTION to: LED strip controller turns ON (last known level)
- Save
The PIXIE LT8915DIM/BT has a memory dimmer built in, so choosing the ON state turns it on at its previous level. If it was at 50% before, it returns to 50%. To force a specific level, use "Turn on with Level" instead and choose the percentage. All PIXIE dimmers ship with memory mode active by default, including the trailing-edge phase dimmer (Gen2, Gen3, SFI), the DALI2 broadcast dimmer, and the 0/1-10v dimmer.
Create a PROGRAM: Sensor #1 time-out turns the LED strip OFF #
Without this second program, the downlights turn off when Sensor #1 times out, but the LED strip stays on until something else turns it off.
- Create another program in PROGRAMode
- Set TRIGGER to: relay in Sensor #1 turns OFF
- Set ACTION to: LED strip controller turns OFF
- Save
Create the "Override ON" Scene #
This Scene will be activated by Sensor #2 at the bottom of the stairs. It puts Sensor #1 into Override ON mode, which turns Sensor #1's relay ON and triggers the PROGRAM created in step 2.
- Open the SCENES area in the PIXIE PLUS app
- Name the scene and pick an icon
- Add ACTION: operate Sensor #1 to Override ON mode
- Save the scene
Create the "Override OFF + return to Motion" Scene #
This Scene returns Sensor #1 to motion mode after Sensor #2 times out. The Scene Delay gives the system a moment to reset cleanly before the next motion event.
- Open the SCENES area in the PIXIE PLUS app
- Name the scene and pick an icon
- Add ACTION: operate Sensor #1 to Override OFF mode
- Add a DELAY: minimum is 3 seconds
- Add a final ACTION: operate Sensor #1 back to Motion mode
- Save the scene
The 3-second delay is not strictly required, but it gives the PIXIE system the best chance to "breathe" between operations. It ensures Motion mode is properly re-engaged and any time-out counters that may have been running in the sensor are reset, so the sensor is always ready to detect the next motion event.
Create a PROGRAM: Sensor #2 motion activates the Override ON Scene #
This is the moment Sensor #2 reaches across and tells Sensor #1 what to do.
- Open PROGRAMode
- Create a new program and name it
- Set WHEN to Anytime
- Set TRIGGER to: relay in Sensor #2 turns ON
- Set ACTION to: ACTIVATE a SCENE, pick the Override ON Scene from step 4
- Save
Create a PROGRAM: Sensor #2 time-out activates the Override OFF Scene #
- Open PROGRAMode
- Create another program
- Set TRIGGER to: relay in Sensor #2 turns OFF
- Set ACTION to: ACTIVATE a SCENE, pick the Override OFF + Motion Scene from step 5
- Save
Test the chain end to end before signing off. #
Run the ALL OFF scene to clear all devices. Recall the Override ON Scene manually, wait, and confirm everything operates as expected. Then recall the Override OFF Scene, wait, and confirm the system returns to a clean state. If anything is off, review the Scenes before checking the PROGRAMs; Scene errors are usually faster to spot.
PROGRAMode supports tracking up to 5 PIXIE master devices and up to 10 or more actions when all triggers are true. This example deliberately keeps it to one trigger and one action per program. More sophisticated programs are absolutely possible, but they create more sophisticated failure modes too, so review carefully when combining multiple triggers, multiple actions, and Scenes that themselves contain Scene Delays.
The simpler way. No Gateway needed. #
This is not strictly a sensor controlling a sensor; it is two sensors both controlling the same Group of devices. With a small amount of planning at the wiring stage, this approach is far easier to deploy, runs faster than a Scene-based chain, and works without a PIXIE Gateway.
Same two sensors at the top and bottom of the stairs, but neither sensor is wired to the loads being controlled. Each sensor has only Active and Neutral connected to power the device itself. The downlights are on a PIXIE dimmer (SDD300BTAM), and the LED strip is on the PIXIE LED Strip Dimmer (LT8915DIM/BT). When motion is detected at either sensor, both light sources operate.
MASTERlink is available in PIXIE sensors with firmware version 1.3 or above (released April 2024). MASTERlink works with both the SAL PIXIE app and the PIXIE PLUS app. Each sensor's MASTERlink can drive any other PIXIE Master device or a Group, with one exception: another sensor.
Create a PIXIE Group with both loads #
The Group will hold the two PIXIE Master devices that drive the lights: the dimmer (downlights) and the LED Strip dimmer (LED strip). Both sensors will operate this Group.
On Sensor #1, turn the MASTERlink function on #
Open Sensor #1 in the app and toggle MASTERlink on.

Press SET to create the MASTERlink #
The SET button creates the link and opens the configuration screen.
Define what MASTERlink does on ON and OFF #
Pick the Group created in step 1 as the target. Configure it to turn ON when the sensor's relay turns ON, and OFF when the sensor times out. Save.
Repeat steps 2 to 4 on Sensor #2 #
Same MASTERlink, same Group as the target. Once both sensors are configured, either one detecting motion (or timing out) will operate the Group.
Faster, simpler, no Gateway dependency. #
Once both sensors are set up, the Group operates the moment either sensor turns ON or OFF. Response is very fast. The main constraint is wiring: this method only works when neither sensor needs to be wired to a load directly. If you do need a sensor on a switchwire, Method 1 is still the right answer.
The full PIXIE thinking under the hood. #
PROGRAMode, Scenes, MASTERlink, and the Gateway G3 are core building blocks across the PIXIE platform. The links below cover each in detail.


