Set up PIXIE Portal #
PIXIE Portal extends the PIXIE Bluetooth Mesh over long distances, reliably and easily, without Wi-Fi or an internet connection. Use it to bring a boat shed, garage, outbuilding, sports field or rural pole into the same PIXIE system as the main residence. This article walks through the product, the limits, the wiring and the in-app pairing in order.
What PIXIE Portal does, in one diagram. #
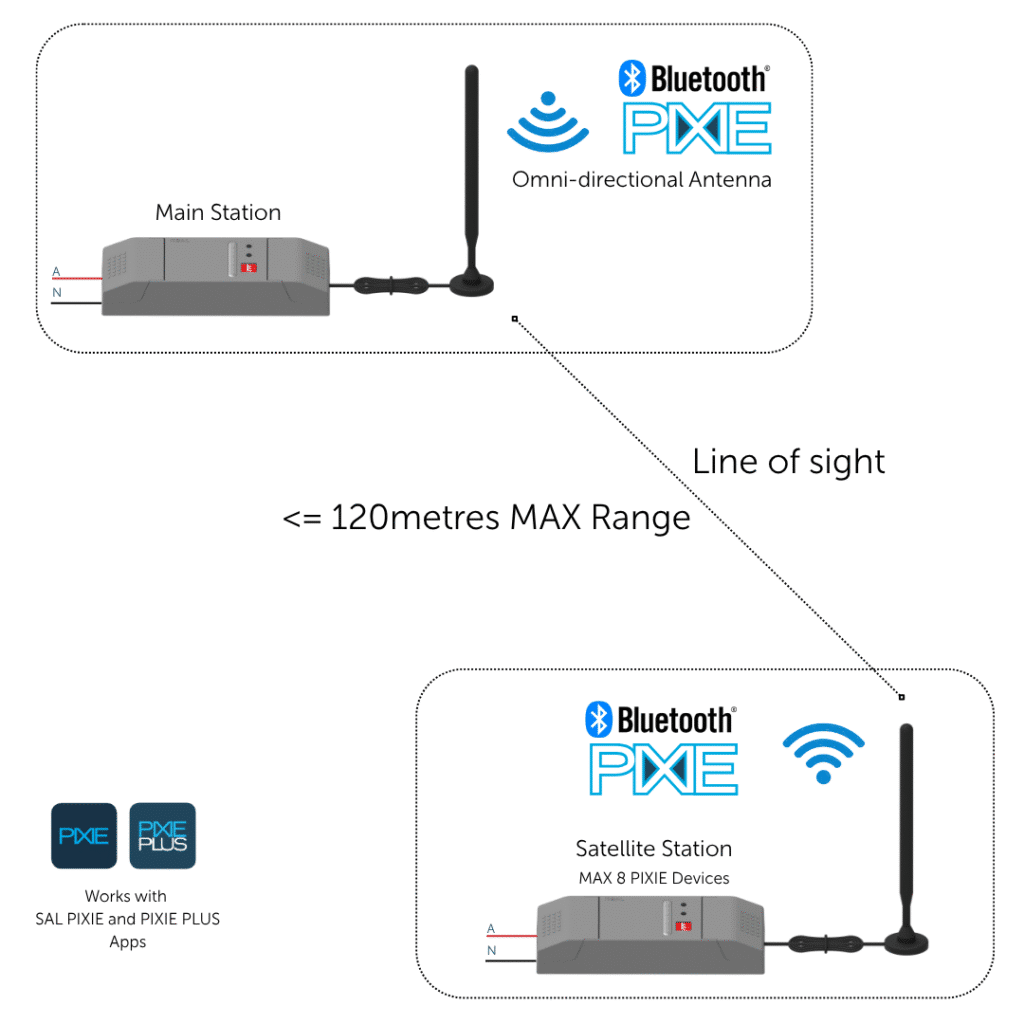
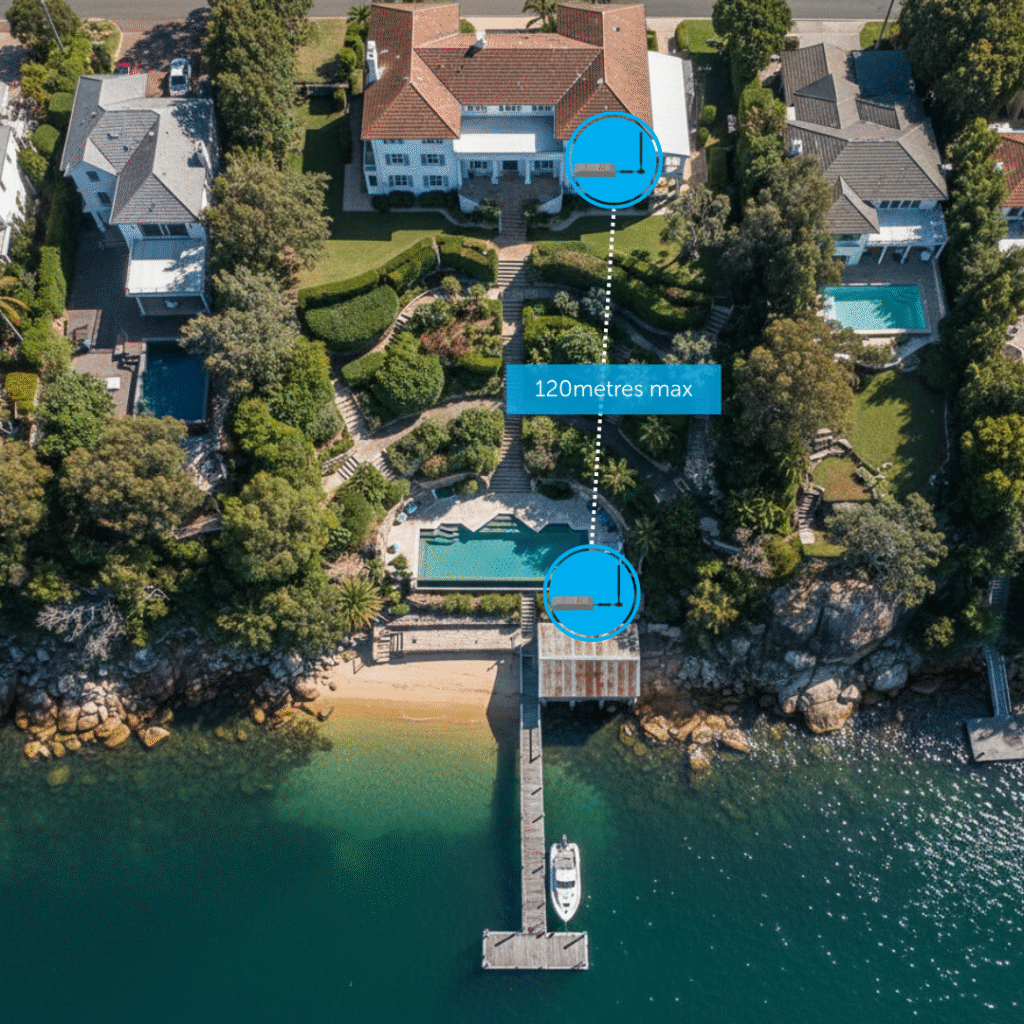
A PIXIE Portal is a pair of devices: a Main Station that sits at the primary PIXIE installation, and a Satellite Station that sits at the remote location. Each station has an external IP65 antenna. Together they bridge the PIXIE Bluetooth Mesh between the two locations across distances normal PIXIE devices cannot reach (which is roughly 10 to 15 metres in a typical home install).
Heavy rain note #
Heavy rain can attenuate the wireless signal by up to 20 percent during the rain event. The 120 metre figure is the worst-case weather scenario. If your installation distance is close to the limit, plan with this margin in mind.
Where PIXIE Portal earns its keep. #
Three patterns cover most installations. The basic principle is the same in every case: one Main, one Satellite, line of sight between the antennas, up to 120 metres apart.
Home plus a detached outbuilding #
A boat shed, garage, granny flat or studio that is more than 10 to 15 metres from the main residence. Bring it into the same PIXIE installation with one Portal pair.
Rural property, multiple buildings #
Up to 4 remote outbuildings can be brought under centralised control from the main residence using up to 4 Portal pairs.
Sports fields and courts #
Centralised lighting control from a club house out to field lighting poles, netball courts, tennis courts and more. Schedules, scenes and curfew control included.
What you get in the pack. #
PIXIE Portal is sold as a complete kit. The two stations and their antennas are matched at the factory and components are not sold separately.
PIXIE Portal Wireless Pack #
- 2 x Portal modules (1 Main Station, 1 Satellite Station)
- 2 x IP65 omni-directional antennas
- 2 x antenna mounting kits with 3 metres of antenna cable each
- 2 x 2-core flex and plug for easy termination and connection to a GPO
Each station is powered from active and neutral. The included flex and plug means a Portal can be plugged into a regular GPO without dedicated wiring, which is useful in retrofits.
The Portal Station, up close. #
Both stations are physically identical. What makes one a Main and one a Satellite is the position of the DIP switches inside (and the factory has already set these for you).
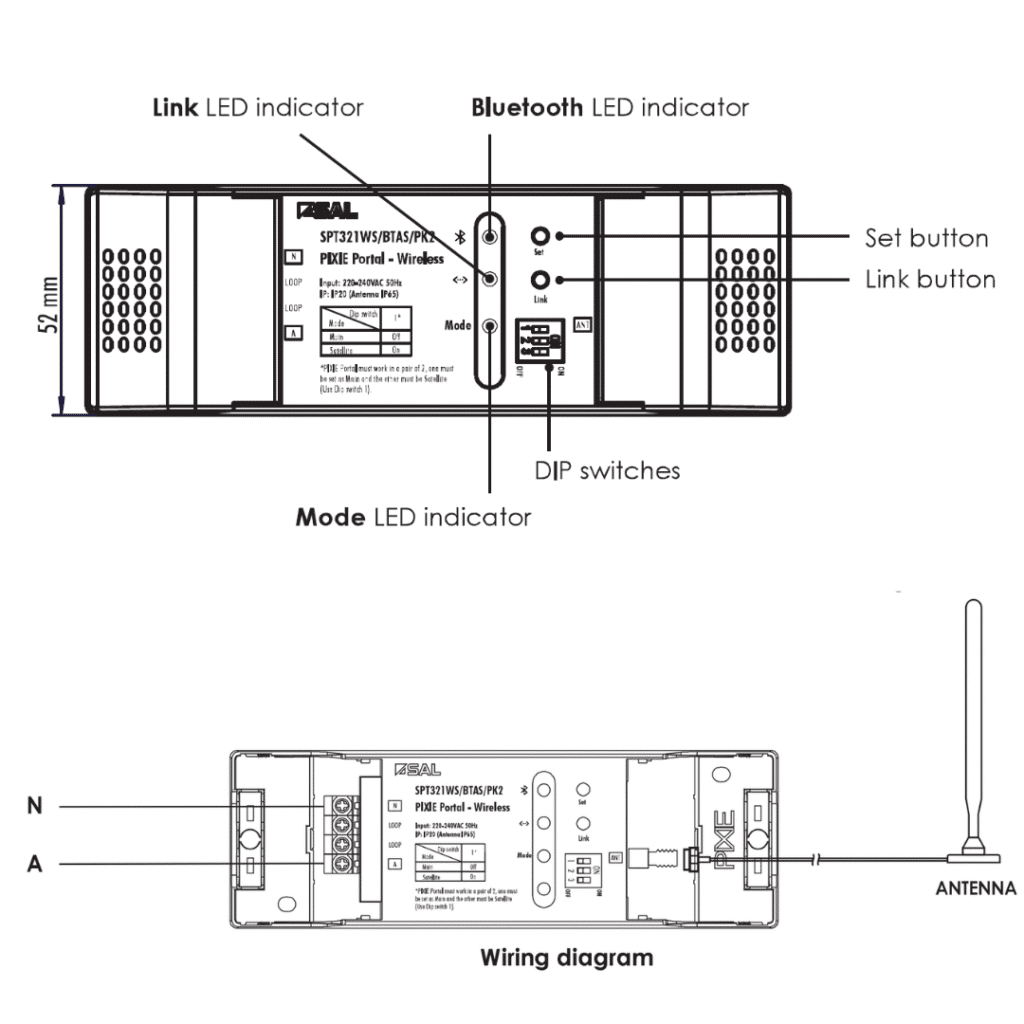

Three switches. That's the whole config. #
Each station has three DIP switches. Switch 1 sets the role (Main or Satellite). Switches 2 and 3 set the channel. For a single-pair installation, the factory settings are correct out of the box.
Main or Satellite #
Each pair must have one Main and one Satellite. The factory pre-sets each pair so one device is Main (for the main residence) and the other is Satellite (for the remote location). Confirm before mounting.
Channel select (4 channels) #
You only need to change these if you are deploying more than one Portal pair on the same site. Both stations in a pair must be on the same channel. Different pairs must be on different channels. Up to 4 channels are available, which is why a single PIXIE installation supports up to 4 Portal pairs.
The operational parameters at a glance. #
Plan your install around these numbers. They apply to every PIXIE Portal deployment.
Heads up: multiple pairs need antenna spacing #
When installing more than one Portal pair, the external antennas must be mounted at least 2 metres apart for optimal operation. Failing to do so will likely cause faulty system behaviour.
Bi-directional control. Commands can originate from either end of the Portal. A Multifunction Controller in the boat shed can recall a scene that includes devices in both the boat shed and the main residence. The location of the device is not relevant - only that it is part of the same PIXIE mesh that the Portal is bridging.
Get the PIXIE devices in first. #
Before you pair the Portal pair to your PIXIE Home, every PIXIE Master and Secondary device at both locations must be scanned and added into the PIXIE or PIXIE PLUS app. This includes the devices at the Main location and the devices at the Satellite location.
Why this matters. The Portal is a transport layer for the mesh, not a configuration tool. Get the devices joined to the PIXIE Home first, then add the Portal to bridge the two halves of the mesh together.
Confirm the DIP switches before mounting. #
Open both stations and visually confirm the DIP switch settings while everything is still on the bench. It is much easier to do now than after they are wired in at two different locations.
- One Portal must have Switch 1 set to Main. This goes in the main residence.
- The other Portal must have Switch 1 set to Satellite. This goes at the remote location.
- If this is the only Portal pair on site, leave Switches 2 and 3 at the factory channel.
- If this is the second, third or fourth pair on site, set Switches 2 and 3 to a channel not already used. Both stations in this pair must match.
Wire each station and connect the antenna. #
Each Portal Station is powered by active and neutral. The supplied 2-core flex and plug means it can plug straight into a GPO if there is one nearby. Connect the IP65 antenna to the station using the supplied 3 metre antenna cable, and mount the antenna where it has the best possible line of sight to the other end of the link.
IP rating note #
The Portal Stations themselves are IP20. The antennas are IP65. If the station is being installed outdoors, it must go inside a weatherproof enclosure. Only the antenna is rated for direct external mounting.
Add the Portals in the PIXIE app. #
Portals are Secondary PIXIE devices. They will not appear in a standard Add Device scan and must be added through the dedicated Portal flow.
The simplified pairing process #
Open the Add Portal flow in the app #
Settings then Configuration then PIXIE PORTAL then Add Portal. Follow the on-screen instructions.
Press a local PIXIE dimmer or switch four times #
Use any nearby PIXIE Master device on the wall. Four firm presses in quick succession.
Press the control button on the first Portal Station four times #
That Portal is now paired into the PIXIE Home.
Repeat for the second Portal #
Same four-press dimmer-then-Portal sequence to add the second station.
Confirm a successful configuration. #
The LEDs on each Portal Station tell you whether the link is up. If you see all four of the states below, the Portal is configured and bridging traffic between the two halves of the mesh.
You are good to go #
If all four LED states match the above, the Portal pair is operational. Devices at the Satellite location will now appear and respond in the PIXIE app exactly as if they were inside the main residence.
Where the antenna goes matters more than the station. #
The antenna determines the link quality. The 3 metre cable means the station itself can be tucked inside a weatherproof enclosure or near a GPO, while the antenna goes wherever it has the best line of sight.
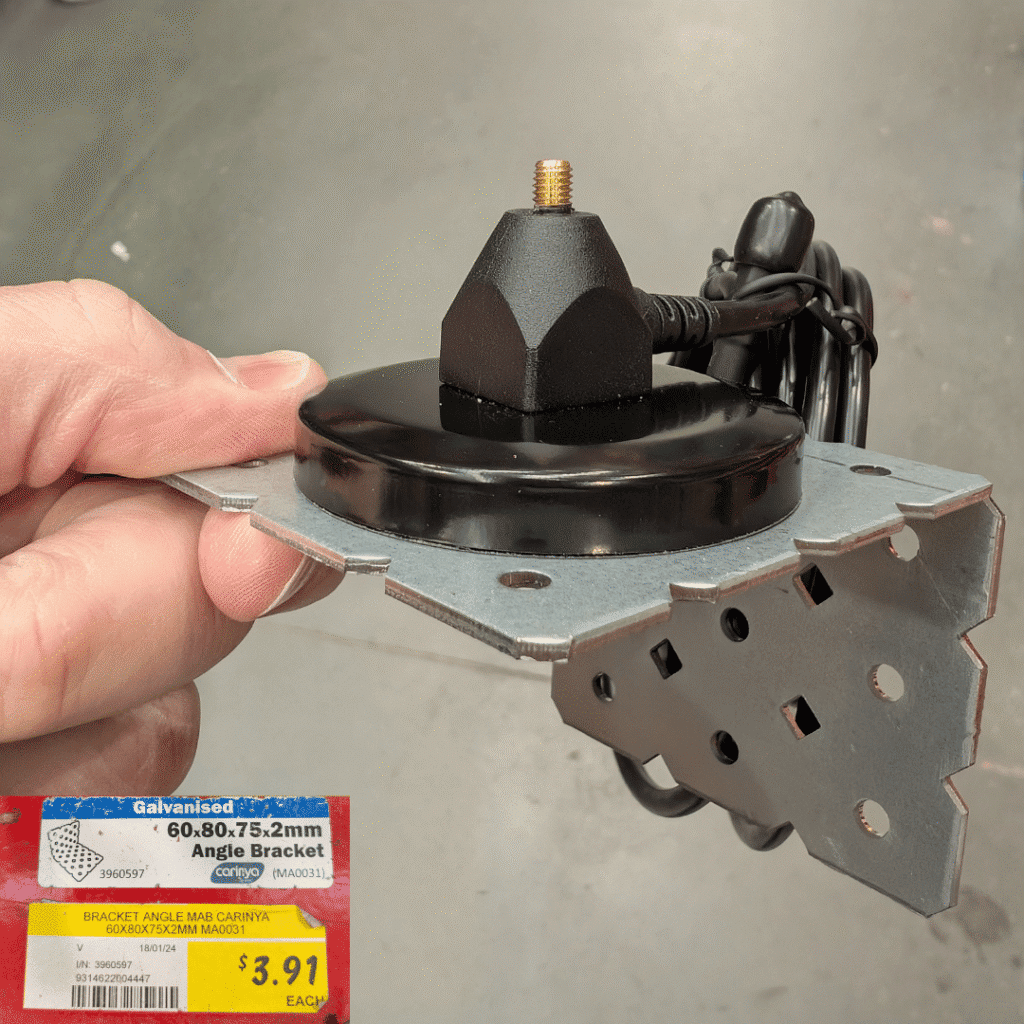
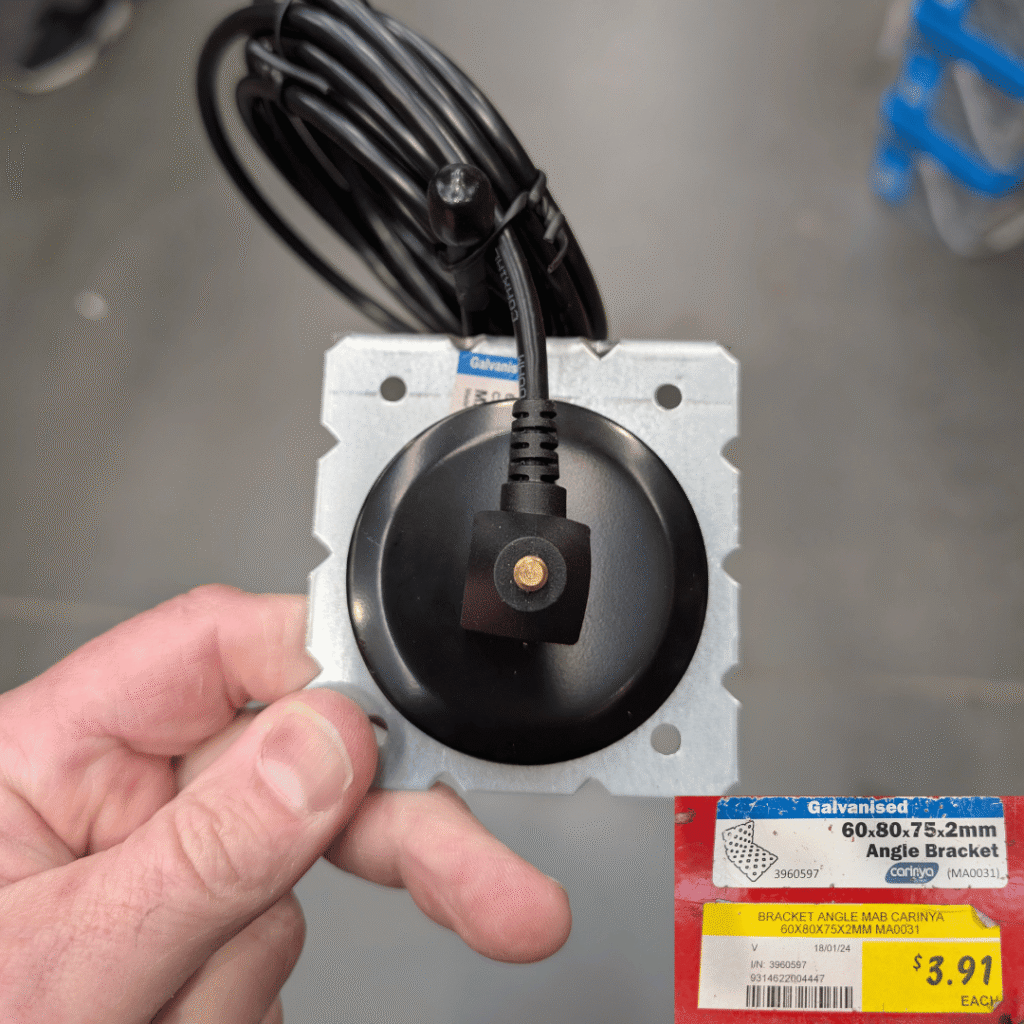
Mounting options #
- The antenna base is magnetic. It can be fixed directly to the outside of a metal shed or any flat steel surface.
- If there is no metal surface to mount onto, a simple galvanised angle bracket from a hardware store works well. Mount the bracket under the eaves of the home or shed and stick the antenna to the bracket.
- Both ends of the link should ideally have line of sight between the two antennas.
Three installs to copy from. #
The basics translate to almost any site. Here are the three patterns we see most often.
Boat shed (or detached garage / studio / granny flat) #
One Main Station in the residence, one Satellite Station in the outbuilding.
Install the residence-side PIXIE products and the Main Station #
Set up your normal PIXIE devices inside the main residence, including the Main Station of the Portal pair.
Confirm the Main Station is within range of the in-home PIXIE mesh #
The Main Station joins the residence mesh just like any other PIXIE device. Standard 10 to 15 metre PIXIE distances apply on this side.
Mount and connect the residence antenna outside #
The IP65 antenna can mount on the outside of the building. The 3 metre cable lets the station stay inside.
Install the boat shed PIXIE devices (max 8 Master devices) #
Add the lighting, fan or relay devices that need to be controlled in the boat shed. Maximum 8 PIXIE Master devices per Satellite location.
Install the Satellite Station and mount its antenna outside #
Wire the Satellite Station and confirm it is within normal PIXIE mesh range of the boat shed devices. Mount the IP65 antenna on the outside of the boat shed with line of sight to the residence antenna.
Rural property with multiple outbuildings #
Up to 4 remote outbuildings under centralised control. Detailed walkthrough coming soon.
The principle: 4 Portal pairs, 4 channels, all bridged into one PIXIE Home. Up to 8 Master devices at each Satellite location, antennas mounted at least 2 metres apart at the Main end.
Sports fields and courts #
Centralised lighting control from a club house out to multiple field poles or courts. Schedules, scenes, curfews and member roles.
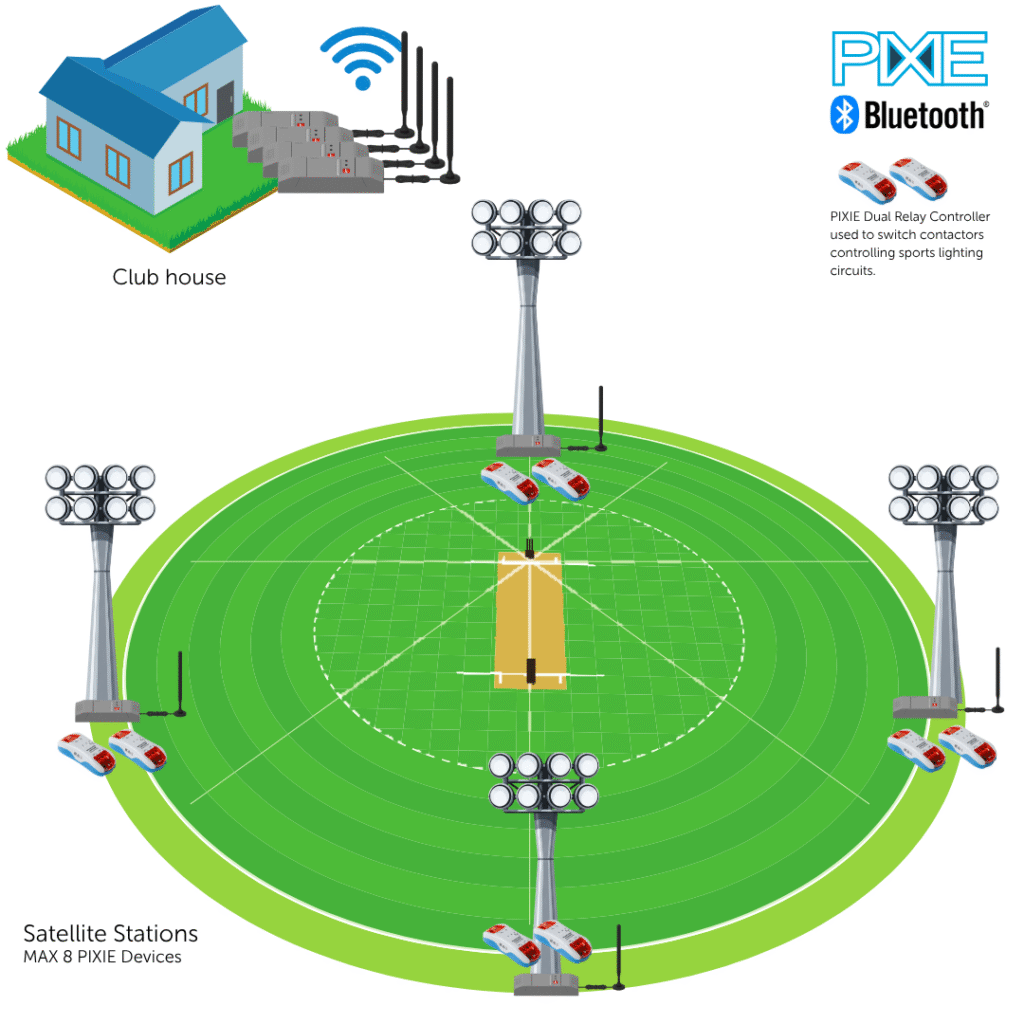
The architecture #
- The club house holds the Main PIXIE installation, including a PIXIE Gateway for on-ground and remote (off-site) access via the PIXIE PLUS app.
- The Gateway also lets PIXIE PLUS handle scheduling and curfew control for every connected device, ensuring lights are always off according to council or league requirements.
- The club house may also have its own PIXIE devices for the bar, locker rooms and landscape lighting, plus 4 Portal Main Stations with their antennas.
- At each of the 4 lighting poles, install 2 x PIXIE Dual Relay Controllers. Each controller has 2 x 6 Amp relay channels, giving up to 4 independently switched lighting circuits per pole. The relays drive suitably rated contactors that switch the actual lighting loads.
- The relays sit inside a weatherproof box on the pole alongside the Portal Satellite Station. The IP65 antenna mounts externally on the pole for reliable line of sight back to the club house.
What it gives you #
- Independent control of each pole or all poles together, as groups, or as scenes (for example a Training scene that turns on only half the lights, or a Game scene that turns on every pole).
- Scheduling for all lighting, including curfew compliance.
- Member roles via PIXIE PLUS: the admin invites users by email or QR code, with each member assigned specific control rights at the device, group and scene level. Access can be revoked instantly by the admin from the PIXIE PLUS app.
Detailed sports field operations. A more detailed write-up of how this works is available here: Sports field lighting control that plays to win: why PIXIE Portal changes the game
Specs, datasheets and related reading. #
For detailed installation documents and datasheets, head to the PIXIE Portal product page. For background on how PIXIE works wirelessly and how to extend the standard mesh, the related links below cover the essentials.


