The PIXIE PC100T-R-BTAS enables PIXIE to be integrated with 3rd party systems by receiving low level / dry contact signals.
Its is also the recommended Bluetooth Mesh Booster for projects using all Gen3 products.
What is it used for? #
This device RECEIVES a signal to its single dry contact / low voltage INPUT via a wired connection from a 3rd party system AND THEN communicates to the PIXIE system in the home via wireless Bluetooth Mesh to perform a pre setup action.
If you need to provide a dry contact / low level OUTPUT to a 3rd party system use the PIXIE Blind and Signal Controller – PIXIE part #: PC206BS/R/BTAM.
The PIXIE Translator Controller requires a permanent / hard active.
This is a very useful device for integrating PIXIE with a wide range of 3rd party systems which can provide dry contact output signals, such as:
- 1. Alarm Systems
- 2. Audio Visual Systems
- 3. Legacy home automation systems like CBUS®, Dynalite®, Control4®, KNX® etc.
This device is used for 2 specific purposes in a PIXIE system:
- 1. To receive dry contact input signals from 3rd party systems – so when something in that other system happens, PIXIE can also respond, effectively integrating PIXIE with that other system.
- 2. Used as a passive PIXIE system Bluetooth Mesh Booster to create a robust mesh for large homes and homes using challenging building materials for mesh networking.
How to setup this device through the App? #
To begin, head to the cog in the top right hand corner of the App to go to the SETTINGS page and choose CONFIGURATION

From this list select the Translator Control menu Item

Dry Contact Input #
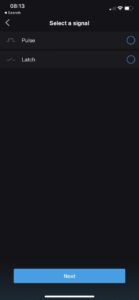
The PC100T-R-BTAS can be configured in a few different ways depending on the device being used to provide the signal.
A pulse can be received from a 3rd party device, with some variations on PULSE time to allow for fine tuned integration.
Latch and / or unlatch capabilities which essentially allows for up to 2 different functions to be performed based on the state of a 3rd party device.
Pulse #
Select PULSE from the menu.

Next you are asked to select the time of the PULSE expected to be received, This can be up to 20 seconds.
Once selected you are presented with a simple sequential logic option.
WHEN → [THIS HAPPENS] – A pulse received to the time set
DO → [THIS FUNCTION]

To create your DO function press the little “+” sign.
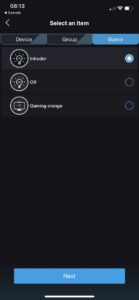
You can then choose if you want to control a device, group or scene.

Choosing to control a single DEVICE you have the option of TOGGLING (switching from it current state to the opposite) that device or setting a particular STATE for the device. ( On/ off, dimmed level, colour if using RGB)
Choosing to control a GROUP you have the option to choose the STATE for the GROUP. ( On/ off, dimmed level, colour if using RGB)
Choosing to control a SCENE, you can simply recall the scene of your choosing.
You must press the Confirm and Start Paring button at the bottom the App page, for this setup to work if you have a physical device connected and you are not just experimenting in the App.
Latch and/or Unlatch #
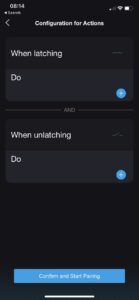
When you instead select the LATCHING option you are presented with another simple, but different sequential logic option.
Note you do not have to setup an UNLATCH action but these can be useful.
For example if you had connected a PIR sensor to the translator you could fire off 1 command to the PIXIE system when first triggered ( and the relay in the 3rd party device latches) and later when the sensor times out and opens its relay you could send off another command.

To create your WHEN LATCHING DO function press the little “+” sign.

Again you are presented with a choice as to control a device, group or scene.
Your choice options for each type are the same as per the PULSE setup options.
If you also want to create a WHEN UNLATCHING DO action repeat this process.
Used as a PIXIE Booster #
The PC100T-R-BTAS is the preferred PIXIE booster and is the primary booster recommend for larger Gen3 based projects.
The best way to think about these boosters is like a WAP ( Wireless Access Point) for PIXIE’s Bluetooth Mesh, which also uses the 2.4gHz bandwidth, like 2.4Ghz Wi-Fi system do. Remember, PIXIE does not communicate between devices using Wi-Fi, it uses Bluetooth Mesh which is different and separate to Wi-Fi – it just uses the same radio bandwidth.
We make this point because, if the home you are installing PIXIE into needs WAP’s, its worth evaluating if your need PIXIE boosters too. WAPs are a good indicator to you that boosters may be necessary.
Installation Recommendation #
The recommended installation process is to install a flex and plug into the device, and then plug the booster directly into the hard active ( via a plug base/quick connect)
Installing the device near a downlight penetration will allow future access – which is needed during initial setup, and may be needed in the future depending on future events.
The Setup Process #
This is the recommend process for adding the PC100T-R-BTAS devices into the PIXIE Mesh.
Remember as it cannot be scanned and added as you do master devices, an alternate method of inclusion is needed.
(1) First, using the PIXIE Plus App, scan the network for PIXIE devices.
(2) Second, add a number of PIXIE master devices from the list of discovered devices, into the network which are closest to the installed location of the booster.
(3) Third, stand next to one of these PIXIE Master devices – like a dimmer or switch – and press the button 4 times in quick succession on this device. The LED indicator will begin to flash indicating the this master devices is in PAIRING mode.
You now have 30 seconds to do step 4 …
(4) Finally, on the PC100T-R-BTAS device, press the single button 4 times in quick secession – just as you did with the PIXIE Master device.
The light on the PC100T-R-BTAS will flash blue and white for up to 10-15 seconds. When it turns solid blue, it has been successfully paired with your PIXIE mesh network and will passively perform its booster function.
Repeat this function for all PC100T-R-BTAS devices being used as boosters.
Troubleshooting Pairing #
If it does not pair, repeat the whole process again ensuring that the master device’s LED is flashing indicative that it is in pairing mode.
You may need to quicken your 4 button presses, if you cannot get the devices to enter pairing mode or pair. Pressing 4 times in 1 to 2 seconds is ideal.
If it does still not pair and the light on the PC100T-R-BTAS is still white, rescan your network, discover some additional PIXIE master devices in the vicinity of the booster you are looking to pair with, add these devices to the network.
Then using one these newly added Master devices, repeat the pairing process again.
Do I need boosters? #
Whether or not you will need boosters in your project will depend on the total number and placement of all other PIXIE devices and the building materials in the home which PIXIE is being installed.
Best to make an allowance based on the recommendations below to cover yourself for product and installation.
What’s the best place to install them? #
As a general rule of thumb, irrespective of building materials. Remember you may not always need them but it is recommended you account for them in your original pricing to ensure robust operation and profitable installations.
1. If a multi-storey home, allow for a PIXIE booster on each level, near the staircase as a minimum. This can ‘knit’ the Bluetooth mesh together through the stair case creating a mesh SPINE of sorts. Not every home will need this, but ensuring you have allowed for it will eliminate any surprises later.
2. If the home has long hallways, or ‘wings’ – such as a separated Master Suite, which results in large distances between mesh devices, install a booster in-between the other PIXIE devices and the separated areas.
3. To control pool houses, cabanas, sheds and other ‘out-buildings’ physically separated from the main home – depending on distances – its may be possible to install 2 boosters to maintain a mesh network and control these areas.
- – Install the first booster in the ‘main house’ outside under the eaves in a weather proof box and ensure it is as near as possible to a PIXIE device inside the home AND aligned with the separated area.
- – In the separated area install the 2nd booster, again in a weather proof box as close to the edge of the building and at least 1 PIXIE device in this out building – and the initial booster.
- – The idea is to have these 2 externally mounted boosters knitting the radio signal together.
- – Note if these distances between buildings is greater than 15-20 metres this is unlikely to work.
- – If it is essential to have the outbuilding controlled with the main house, AND internet connectivity can be provided in the separated building, it will be possible to control with the addition of some extra equipment, not boosters. However this can be quite a costly process, but it will 100% work.
Interested in this option?
We are creating a support article for this – in the interim, please simply email info@pixiepartners.com.au and detail your situation so we can help.

The PIXIE Troubleshooting Guide has more information about using boosters and checking signals on PIXIE Homes
⇒ Download Troubleshooting Guide
We provide a free PIXIE design service – simply upload your plans and receive a complete design, including booster placement, for free.
⇒ Claim your free PIXIE Design Here


